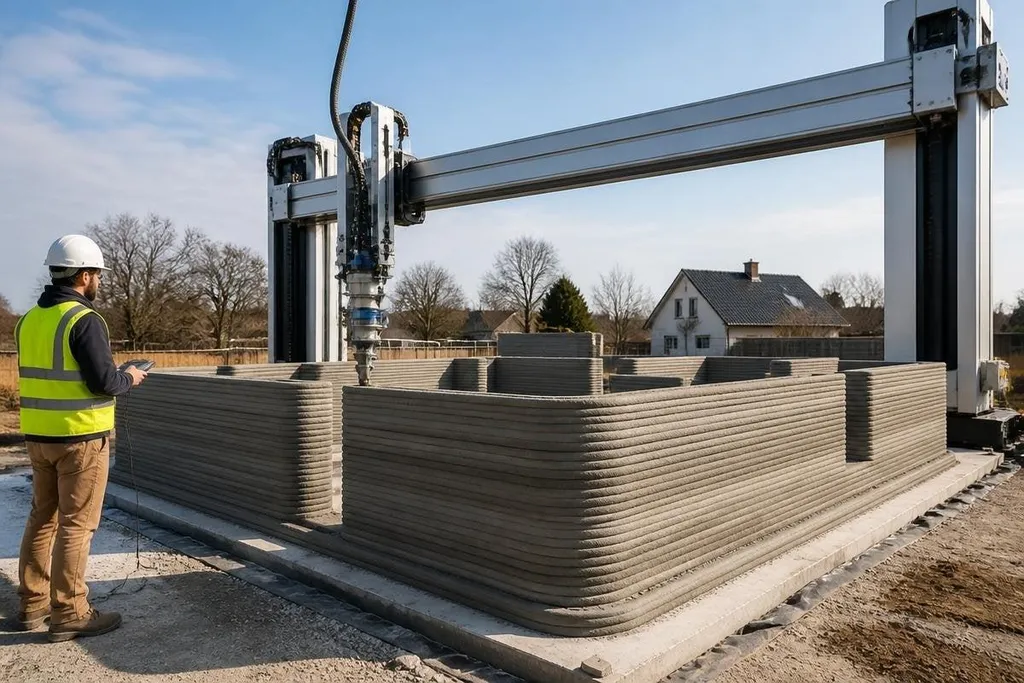
A house-printing robot usually builds walls, not a complete house. It lays wet cement-based material through a nozzle, adding one layer after another until the wall reaches its planned height.
The method can reduce the need for formwork and move some construction work into software. It still depends on a prepared site, trained operators, building checks, and other crews for roofs, wiring, plumbing, windows, and finishes.
Quick read
- The robot follows a digital wall path and deposits material in layers.
- The mix must hold its shape while the next layer bonds to it.
- Openings, reinforcement, weather, and local building rules still need human planning.
What the robot actually prints
A 3D-printing construction system normally includes a motion system, a material pump, a print head, control software, and a cement-based mix. The motion system may run on rails, a gantry, or a robotic arm.
Its job is to move the nozzle along the wall path set by the digital model. The pump sends material to the nozzle at a controlled rate, and the nozzle spreads a bead of mix onto the layer below.
Next, the print head rises or moves along its next path, repeating the process until the wall is complete.
That sequence sounds close to desktop 3D printing, but the material behaves differently. A construction mix must flow through a hose, leave the nozzle in a steady shape, support the layers above it, and bond with the layer below before the wall moves too far ahead.
How a digital plan becomes a wall
The process starts with a building model. Software divides the planned wall into tool paths, which are the lines the nozzle will follow. The plan must account for wall thickness, corners, openings, curves, and places where pipes or cables will pass through.
The site team then positions the robot and checks its reference points. A small placement error can grow as the wall rises, so the system needs checks for height, position, material flow, and nozzle movement. The printed wall must also match the approved construction plan.
Doors and windows require special planning. The robot may print around an opening, stop at a planned height, or leave space for another part of the build. Printing a wall does not remove the need to install frames, lintels, insulation, or weather protection.
The material controls the pace
The mix is one of the hardest parts of the process. If it flows too easily, fresh layers can spread or slump. If it sets too quickly, the new layer may not bond well with the one below it. Pump pressure, nozzle size, layer height, water content, and setting time all affect the result.
Weather adds another variable. Heat, cold, wind, and rain can change how the material moves and cures. A site may need shelter, adjusted material handling, or a pause in printing when conditions fall outside the planned range.
The printed surface can also show visible ridges between layers. Some projects leave that texture exposed. Others cover it with render, cladding, insulation, or another finish. The final wall still needs checks for strength, moisture, fire performance, and connection to the rest of the building.
Once the nozzle stops, the crew still has to inspect the wall and finish the building. Reporting from Robot24.com can place those tasks beside the printer’s claimed output and site results, so you can see where printing ends and construction work begins.
What still happens after printing
The robot handles one part of construction. People and other equipment still prepare the ground, make the foundation, position services, install reinforcement where required, fit the roof, and close the building against weather.
Building rules also vary by location. Approval may depend on the material, wall design, structural method, fire rating, insulation, and local inspection process. A printed wall can be technically sound and still need changes before a permit is granted.
That limits the value of judging the method by print speed alone. The useful measure is the time and labor saved across the whole build, including setup, material supply, inspection, finishing, and repairs.
A site decision guide
Before choosing a 3D-printing system for a house project, check these points:
- Confirm that local rules accept the proposed wall system and material.
- Map every pipe, cable, window, door, and reinforcement point before printing.
- Test the mix under the expected temperature and humidity on site.
- Plan where the robot, pump, hoses, workers, and material deliveries will stand.
- Assign checks for wall position, layer bonding, openings, and surface damage.
- Price the work after printing, including the roof, services, insulation, and finishes.
The strongest case for construction robots is a project with repeatable wall layouts, good site access, and a team ready to manage the material and inspection work. A complex design or poorly prepared site can erase the time saved by the printer.
These systems are best understood as automated wall-building tools. The next test is not whether a nozzle can place cement layer by layer; it is whether the full building process can meet local rules, hold its quality, and cost less after every other trade is included.